Most Recent

How to Elevate Your Backpacking and Camping Food Game

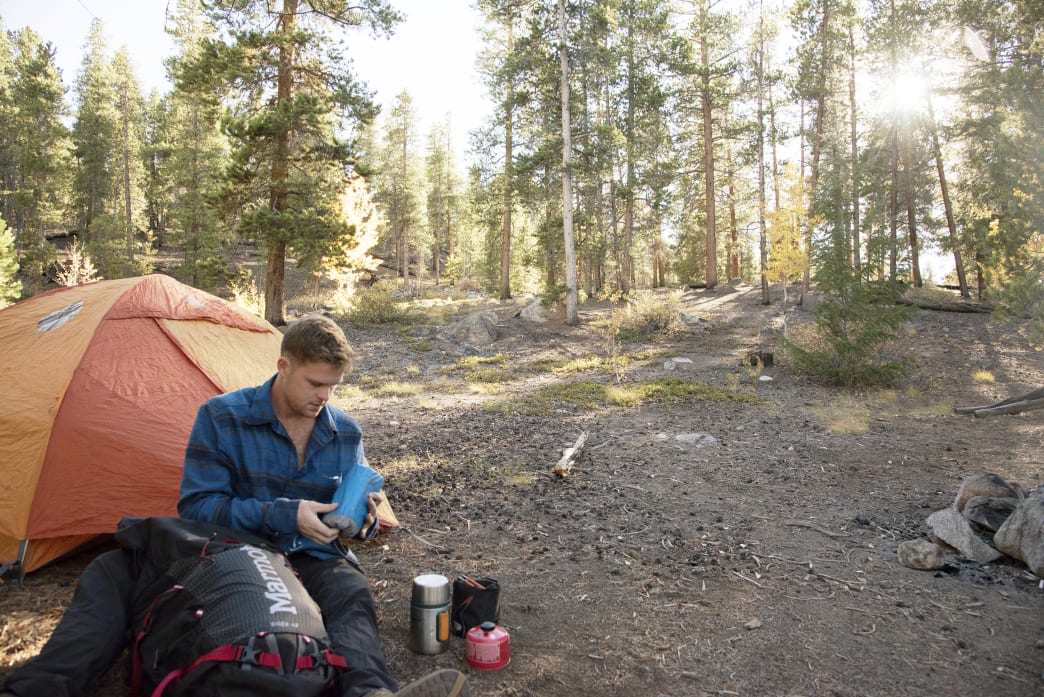
Food tastes better in the outdoors… we’re pretty sure it’s science. But no matter how delicious your favorite freeze-dried meal is, or how much you swear by tortillas and peanut butter, trying something new never hurts.

It’s easy to enhance backcountry meals without much extra effort. Whether you’re car camping, out for a backcountry weekend, or in it for the long haul, here are a few ways to elevate your food game during your next trip.

1. Car Camping

View this post on Instagram

chow time

A post shared by Jake Wheeler (@jakeewheeler) on

The sky’s the limit regarding weight/packability when car camping. Get a good cooler, bring a spare fuel canister, and stash a few extra garbage bags to pack out waste.

Prep each meal as much as possible

Prepping meals at home helps eliminate food waste to pack out, keeps the campsite organized, and saves time you’re better off enjoying in the great outdoors. Prepping can include pre-scrambling eggs in a Tupperware instead of packing the whole carton, slicing and portioning veggies, and throwing seasoning on your food while you have your whole spice rack in front of you.

Adding protein saves even the most boring meal

Add protein to everything, and cook it ahead of time if you can. Not only does pre-cooking save the ickiness of packing around raw chicken, but it lets you portion and plan better for meals. Adding packaged meat, like tuna or chicken packets, works wonders for generic carb-heavy dinners. Bacon bits on your wrap is a surprisingly delightful addition for lunchtime fuel, and those meaty morsels enhance a morning scramble as well.

Make This: Pesto Pasta with Chicken

At Home:

Season and cook two chicken breasts, cut into chunks, and tuck into your cooler where it will stay chilled. Pack a box of pasta, one package sundried tomatoes, and one package dried mushrooms.

At Camp:

Bring water to a boil, add pasta, sundried tomatoes, and mushrooms; cook. Stir in chicken and pesto. Eat the heck out of it.

2. Overnight/Weekend Trips

View this post on Instagram

setting up camp

A post shared by Jake Wheeler (@jakeewheeler) on

An overnight trip isn’t long enough to worry too much about food weight, but you still aren’t packing cans of refried beans. Trail recipes are fun to experiment with, and you can plan ahead and bring extra ingredients to have something to look forward to at camp.

Season the heck out of generic meals

Mixing up another Alfredo Pasta Side? Spice it up. Tic-tac boxes make terrific portable spice containers—bring a few staples (garlic powder, paprika, cumin) or create your own blends at home and pack your favorites. Adding a cajun or italian spice blend to couscous or pasta brings it up a few flavor notches while hardly adding any weight to your food bag. Packets of soy sauce, mini bottle of Tabasco, and even a travel-size salt/pepper shaker make a huge difference when you’re craving flavor.

Drink your breakfast

You need fuel for the morning miles, but sometimes the desire for another crumbling Pop Tart or gummy oatmeal packet isn’t there. Enter Carnation Instant Breakfast. Two packets shaken in a liter of water = quick and easy calories. Feeling fancy? Toss an instant coffee packet in the bottle as well. This is a dirtbag mocha and it tastes better than it sounds.

Make This: Overly Indulgent Breakfast Bag

At Home:

In a Ziplock: Mix one cup of your favorite granola with a handful of freeze-dried fruit, slivered almonds, and dried cranberries. Add ½ cup powdered milk (or protein powder for an extra boost) and zip ‘er up tight.

On Trail:

Wake up, take in the view, add enough water to rehydrate the milk, shake it up, and enjoy a surprisingly fancy breakfast-bowl-in-a-bag.

3. Long-Distance Hiking

This is all about the weight-to-calorie ratio. When you’re packing food for up to a week, or planning resupply boxes for a thru-hike, you want to keep your food weight down while your calories sufficient to fuel long miles with a heavy pack. We don’t differentiate as much between extended trips (1-2 weeks) and thru-hikes (3-6 months) because most hikers won’t be out much longer than a 7-9 days without resupplying.

Stoveless? Try cold-soaking couscous

Many long-distance hikers swear by their cold food. It saves the weight of a cookset and fuel and eliminates the effort of washing dishes and gathering extra water. Couscous can be cold-soaked in a Ziplock bag (allow 30 minutes to fully soften) and devoured right on the spot.

Add olive oil… to everything

A thru-hiker can burn up to 10,000 calories a day, so sneaking calories without extra bulk is important to keep energy high and chewing effort low. Olive oil is a fast, easy, and relatively tasteless way to add extra calories to your meals. Choosing the higher-calorie items, like tuna packed in oil instead of water, will also add similar calories without having to eat more.

Resupplying during your hike? Pack out heavy food and eat it the first day

In the battle between weight and calories, fresh foods come out on the losing end, which means you’ll be eating a lot of processed foods during an extended hike. But on resupply days, allow yourself to pack out the heavy things, and eat them on the first day. Thru-hikers often pack out fresh fruit, a pack of deli meat, and sometimes an entire pizza, then eat it during the first day back on trail.

Make This: Low-Cash Lo Mein

Dig a Ramen packet, a handful of beef jerky, and a soy sauce packet out of your dilapidated food bag.

Mix it. Cook it. Enjoy it. The whole thing weighs several ounces at most and is an easy way to make your sad instant noodles more palatable.

Written by RootsRated and legally licensed through the Matcha publisher network. Please direct all licensing questions to [email protected].

Featured image provided by Ry Glover

Colorado Trail – Backpacking

Intro

The 486-mile Colorado Trail starts at Waterton Canyon on the outskirts of Denver and goes west into the heart of the Rocky Mountains, ending in the town Durango. As Colorado’s premiere thru-hike, it offers a wealth of fantastic backcountry camping for both backpackers and those looking for a quick weekend escape. A majority of the trail is over 10,000 ft. (with a high point of 13,271 ft.) meaning you’ll be basking in the glory of alpine scenery for a bulk of the adventure.

The Colorado Trail passes through eight mountain ranges, six National Forests and six wilderness areas. Those hoping to hike the entire distance will have to conquer a lung-busting 89,000 total vertical feet of elevation gain. East of Monarch Pass, the trail is mostly in wooded areas with relics of Colorado’s mining past including ghost towns, abandoned railroads and several closed mining operations. West of Monarch Pass, the trail assumes its more wild side, reaching into remote sections of the San Juan mountains — the most isolated and untouched wilderness in the state.

What Makes It Great

The option to thru-hike or knock off the trail in chunks is great — many of the trailheads are easy to reach and start near well known mountain towns. The chance to watch the landscape evolve from the nearly flat prairie of Waterton Canyon to the majestic heights of the high peaks is truly amazing. The camping is outstanding with many established sites near rivers, lakes and streams. The Colorado Trail may not have the glamour of other American long trails (such as the Appalachian Trail or the Pacific Crest Trail) but it has all the challenge and beauty — if not more.

Connecting with the wilderness is good for the soul and the Colorado Trail offers a pathway into much more than the mountains. Those who traverse its entire 486 mile length will come to know the spirit of Colorado and what makes our mountains so special.

Who is Going to Love It

Backpackers, day-hikers and even mountain bikers (where allowed) will love the terrain that the Colorado Trail explores. Peak baggers can add to the experience by tacking on summits along the way (there are over 100 that are reasonable climbs from the trail).

Directions, Parking, & Regulations

For details on hiking the Colorado trail, please visit the Colorado Trail website. This site has detailed information on trailheads, distances, maps, camping, fees and much more.

Written by James Dziezynski for RootsRated and legally licensed through the Matcha publisher network. Please direct all licensing questions to [email protected].

Featured image provided by Creative Commons

Eldorado Canyon

Intro

Eldorado Canyon features over five hundred routes with trad, sport, and top rope routes. Known for its gold and red cliffs, this place is a trad climber’s haven. It’s only 7 miles from Boulder, which makes it very accessible. And there are a lifetime’s worth of climbs.

Bastille Crack (5.7+) is one particularly classic climb, but can be crowded especially on summer weekends. Bouldering is also popular in Eldo Canyon with many problems not named. The park can get very hot in the summer. North facing climbs will offer the most shade.

What Makes It Great

Eldorado is a classic destination that is entrenched in America’s climbing lore. Epic sandstone walls reach over 700 feet from the ground and the trad climbing is an excellent benchmark of a leader’s ability. Unlike Boulder Canyon, where the grades can be a little soft, Eldorado Canyon was developed at a time when 5.10 really meant something. It’s not unusual for experienced climbers to be humbled by the puzzling technical climbing and creativity needed to excel on the rock.

Eldo really requires a full bag of tricks. Many climbs utilize counter-intuitive face moves and run out traverses. Even the low grade classics like Wind Ridge (5.6+) and Bastille Crack (5.7) are not as easy as their grades suggest. Over the Hill (10.c) and Rosy Crucifixion (10.a) are excellent intermediate routes, while the fabled Naked Edge (11.b) may be the most famous expert climb, featuring hard moves on run out, sketchy gear, not to mention pucker-worthy exposure.

All that said, if you’re the type of climber who thrives on challenge — or a climber of any level who wants to up their game — Eldo is the place for you. You’ll find a combination of cranky old locales and stoked millennials on the rock, but the overall vibe hearkens back to a bypassed era where “no whining” was an expected mantra for all climbers.

Who is Going to Love It

Expert climbers and intermediates looking to push their limits are going to love Eldo. Newer climbers following a strong leader can learn a lot hear, not just from the challenging climbing but also for the challenging belays (a lot of routes are run out of feature less-than-bomber protection options). One thing is true: if you can climb well in Eldo, you’ll crush it anywhere else in Colorado. Many experienced climbers have spent decades at Eldo and still feel like they’ve only scratched the surface of what the walls have to offer.

There are also over 100 established bouldering problems (you can read more on Mountain Project here), which make this area versatile for those looking to master their moves. Yes, the bouldering is just as burly as the rock routes.

Directions, Parking, & Regulations

From Mountainproject.com—From Boulder, take CO Hwy 93 (Broadway) South until you get to the first stop light after leaving Boulder. This is Eldorado Springs Dr. Take this West until you hit the town. The park entrance is at the end of the dirt road into town. Pay entry fee per vehicle to park or walk-in for less. You WILL be ticketed if you park in undesignated spots outside of the park…. The Eldorado Springs bottling company is right off the road to the park. You used to be able to get a free fill-up on your water bottle, but now it’s a pay deal. What a rip, man.

Written by Courtney Johnson for RootsRated and legally licensed through the Matcha publisher network. Please direct all licensing questions to [email protected].

Featured image provided by F Delventhal

Guide to Climbing Gyms in Boulder

Boulder is a training ground for countless world-class athletes, and it’s not hard to see why. The city is at the foot of the famous Flatirons, and is just a stone’s throw from iconic locations like Eldo, Boulder Canyon, and Lumpy Ridge, among others. As the days get colder and snowier, though, Boulder climbers will be spending less time training outside and more time pulling plastic. Fortunately, the People’s Republic has facilities for climbers of all interests and abilities. Here, a quick guide to climbing gyms in Boulder.

First in Bouldering

The Spot is Boulder's only dedicated bouldering gym, and was the first bouldering-only facility in the country. The scene at The Spot is focused on community: This facility hosts national and local competitions and events regularly, along with members-only workshops. With 15,000 square feet of climbing and walls that imitate beloved bouldering destinations, it's an ideal training ground to get strong before taking your moves to the boulder fields of Colorado and beyond.

Beginners shouldn't be intimidated, though: Top-roping walls and easy problems mean anyone can have fun climbing at The Spot. After you're done climbing for the day, enjoy one of the two draft beers The Spot always has on tap and meet some folks to give you a spot for your next visit.

No-frills Training Like the Pros

CATS is low on frills but big on whipping you into great climbing shape. 
    Jessica Shuck
CATS is low on frills but big on whipping you into great climbing shape.
Jessica Shuck

CATS (Colorado Athletic Training School) is a no-nonsense gym built to get you strong and focused on climbing and gymnastics. CATS doesn't have a juice bar or slacklining events, but it does have a systems wall with an ever-growing list of user-invented problems to make you the best climber you can be. The fun is in inventing moves and problems that help you with what you're working on and challenge your friends. Don't be surprised if you find yourself climbing next to Daniel Woods or Angie Payne, both of whom use the facility to train for their groundbreaking ascents around the world.

The Boulder Institution

Boulder Rock Club has been around since 1991, so it ranks among America's first indoor climbing facilities. BRC is constantly updating its routes, and route setters work to ensure that no route at the gym is older than two months. With a freshly remodeled facility, BRC has enough routes to keep newbies and veteran climbers engaged and progressing. The facility also prides itself on having something for everyone. With tons of family programs, youth climbing clubs, camps, and teams, and a wide variety of fitness classes, BRC is still at the cutting edge of indoor climbing.

Colorado Climbing Experience

Movement Boulder opened more recently than its neighbors, but already boasts some very Colorado cred. The facility was designed to be as eco-friendly as possible, with renewable energy and efficient building techniques. The Movement building was also designed with input from experts in the climbing, yoga, and fitness communities in Boulder. As a result, the facility keeps its members happy with more than 50 fitness classes offered weekly. Busy Boulder parents can take advantage of the on-site child care to get a workout in.

And even with all its other offerings, Movement manages to keep a keen eye on the quality of its routes: This facility has hosted national competitions and is regularly used by pro climbers.

Written by Emma Walker for RootsRated and legally licensed through the Matcha publisher network. Please direct all licensing questions to [email protected].

Featured image provided by Photo courtesy of Movement Climbing + Fitness Boulder

So, You Want to Go on a Solo Van Trip?

With the storm clouds from the day’s rain still lingering, the setting sun ignited the sky in intense golden light and vibrant hues of pink. Maneuvering my rusty Sprinter van through curve after curve, descending deeper into the canyon that leads to Zion National Park, I felt like nothing could stop the good vibes that pulsed through me as I drove into the unknown.

A few hours earlier I had decided on a whim to leave St. George, Utah and continue pushing forward on my eastward journey from California to Tennessee. Since Zion was somewhere entirely new for me, my focus was split between taking in the views of sandstone spires jutting into the sky, and glancing at a map of dispersed camping areas that I could call home for the night. Bumping down an empty dirt road, I reached the fork that led to two free camping areas, only to find that the heavy rain had turned both roads into thick red clay that would be like quicksand for a loaded up van. With Plan A and Plan B now out of the question, I pulled over and started pondering my next move, one that I like to call “Plan C What Happens”. I turned to my travel partner, Rodi—a one-year-old Australian Cattle Dog—and asked him what we should do. No response.

Solo van trips often feel this way: moments of elation punctuated by moments of “oh, shit”. Coming from someone currently on the road, here’s what to consider when thinking about taking on a van trip alone.

Finding the Balance between Introverted and Outgoing

4f1O1sqKuQ00Eeq2OSmoyS
Van life comes with legit perks.

Jenna Herzog

For anyone considering this type of trip, let me be the first to break it to you: you will inevitably spend a lot of time alone. Behind the wheel, making your morning coffee, finding a camping spot at dusk, and wandering through a new town are just some of the many times when you’ll find yourself sans company. Being comfortable with that is essential.

At the same time, traveling alone opens you up to meeting plenty of new and interesting folks along the way. I’ve found that while living in my van without a partner, I don’t have much choice but to be outgoing. Whether I’m walking up to a stranger at a full campground to see if I can park my van at their site, or asking a coffee shop owner where to find a shower in town, surviving and having fun on the road is only possible with the help of others.

Campgrounds, cafes, and outdoor gear shops are typically my go-to spots for meeting people when I arrive to a new place. Though constantly introducing myself can get exhausting, I find it well worth the effort as a way to meet people who I can chat, camp or rock climb with. While traveling solo, the random people that I strike up conversation with frequently shape my adventures and make for a good time on the road.

Fighting Loneliness on the Road

teyS6u23yCaYgKOgoq8SG
Co-pilot's are a necessity in van life.

Jenna Herzog

Adventuring solo doesn’t necessarily mean feeling lonely all that often. My main piece of advice for solo van travelers would be to find a community that you can connect with wherever you go. The van life community is a surefire choice, so don’t be shy to chat up the other people you see cooking dinner out of a van in a parking lot. I’ve found the van life community to be rather far flung, including everything from twentysomethings living out of their vans as they work in one place, to retirees touring around in luxury rigs. Because of this, I’ve made easier and deeper connections with the rock climbing community, so I suggest looking to your passion as a way to find people.

Staying in touch with friends and family back home does wonders for making you feel like a semi-normal member of society. It can be challenging if you’re frequently in places without cell service or internet, but making the effort to call home during long drives or on rest days can do wonders to help you feel grounded. If possible, make plans to meet up friends along the way to break up your time spent talking to yourself. Reach out to the people you know wherever you visit, or invite along friends and family who may be willing to join in on the adventure for a week or two. Also, bring a dog. If you don’t have one, adopt one.

Planning Expenses

54PXP9CSZWMqQAgWoMo8Gu
New day, new adventure in van life.

Jenna Herzog

One of the first questions people ask me about my trip is how I can afford it financially. For one, life on the road is intrinsically less expensive than living stationary, thanks to no rent or utility bills and little need to buy new material items.

Among the many different ways to cover the expenses of van travel, two popular choices include working seasonal jobs along the way or saving up for a period of time beforehand. I chose the latter, working a full-time office job with the goal of converting my empty cargo van and hitting the road for wilder pastures. So far, I’ve driven through six states and I’ve spent less money on gas than I would have paid making my daily commute to the office.

General frugal living techniques—“dirtbagging” if you will—can help keep the costs of van travel to a minimum. Making an effort to find free camping or share campgrounds, partaking in the occasional dumpster dive behind a grocery store, and only shelling out for a $5 shower when absolutely necessary are some the keys to cheap living. At the same time, when traveling alone it’s worth it to cut yourself some slack and splurge on the things that will make for a better experience, whether it be making room in the budget for a drink at the local bar or springing for an Airbnb every once in a while.

Staying Well & Keeping Safe

4jwR4heHxeMGysaCwCosi4
Living the van life allows you to see things you might not normally.

Jenna Herzog

Right after how I pay for my travels (okay, and “where do you go to the bathroom?”), the next question I frequently get asked is if I feel safe alone on the road. The answer is yes, but it comes with some effort and routine. I follow a set of basic guidelines to reduce risk, like taking frequent breaks when driving long distances, locking my van whenever I leave it and when sleeping inside it, minimizing the time I spend driving at night, and moving to another camping spot if I ever feel insecure where I am. Having previous travel experience is a big help in this regard, as developing that intuitive sense of the people and places you can trust is crucial.

Doing your best to stay healthy can save you the trouble of spending four days rethinking your life choices as you nurse a flu or a cold in your van. Though it can be tempting to chow down on chips and chocolate bars, taking the time to cook healthy meals certainly impacts how good you feel. Having a convenient kitchen setup in the van—with a cooler or fridge, stove, propane, water source, and cooking supplies—can make the difference between making a quality meal at camp or succumbing to snacks for sustenance.

Parting Note

Practical elements aside, taking a solo van trip creates a lifestyle of ultimate freedom, where embracing spontaneity is essential and chasing curiosities becomes the norm. I’ve learned to attain a sense of peace by living in that awkward space of the unknown, and to feel comfortable wherever I find myself. So long as you fill your days with what makes you truly happy, life becomes a lot bigger when you live in a tiny space.

Written by Jenna Herzog for RootsRated and legally licensed through the Matcha publisher network. Please direct all licensing questions to [email protected].

Featured image provided by Jenna Herzog

How to Introduce a Loved One to Adventure Travel

"Are you crazy?" my friend exclaimed. “He’ll never want to travel again!” I simply smiled. We were catching up and discussing my upcoming travel plans, which involved a multi-day jungle trek with my city-slicker brother in tow.

I’m a well-seasoned travel vet, with more than 35 countries on my passport. On the contrary, my younger brother had never left the country. Somehow, I had managed to convince him to come trekking and surfing in Colombia with me. We decided on the destination together. He wanted to visit some place tropical, but one that didn’t have a resort vibe. I can’t resist the temptation of a good hike. After a month or two of back and forth, we settled on Colombia.

So off we went to the country’s remote Caribbean coast, where we would explore muddy jungles and catch a few waves in the rough surf.

It turned out to be my brother’s favorite vacation, and now he’s hooked on chasing adventure wherever he goes. Here, some insider tips on introducing someone you love to the wonderful world of adventure travel—and inspiring them to love it as much as you do.

Make the Trip About Them

The best way to make someone comfortable with overseas travel is allow them to choose where they want to go. A few years back, I took my partner on his first overseas excursion. He chose New Zealand as our destination. The following year we found ourselves high in the Himalaya of Nepal, also his idea.

When you give the newbie adventurer the power to decide on a destination, you allow him or her to drive the intensity of the trip. Ownership of deciding where to go seems to instill more confidence in their ability to tackle adventure. Maybe your loved one has a bucket list destination in mind, or maybe it’s just the desire to check out a place they’ve never been to before.

Your travel partner can also help provide general information that helps narrow down the decision. My brother, for example, told me to pick a country, but it had to be tropical and couldn’t feel like home. Consider the following questions to get the conversation started.

  • What is your budget?

  • Are you looking to travel overseas, or keep it domestic?

  • How long are you willing to be in-transit?

  • Is any activity, region, or landscape off-limits?

  • How long are you willing to be outside of your comfort zone? A couple of days? The entire vacation? Or for only a few activities?

Involve Them in the Planning Process

3sOQKemiCk0Uaiu8oyWEUi
Trekking through the muddy jungle certainly creates a great twist in the adventure.

Meg Atteberry

Adventure travel takes a fair amount of careful planning and research. Instead of driving the entire decision-making process, utilize a group decision mentality. Some people feel hesitant about jumping into something new, so allow your loved one to get involved in the nitty-gritty details so they know what to anticipate and, just as importantly, start to learn how to plan their own adventure–for example, how to research outfitters.

Accommodation expectations are a great place to start. Will you be sharing a room, house, or apartment? Decide if you want to stay in a home-grown hostel or a five-star luxury resort. If you are camping, backpacking, or doing something new and unfamiliar—kite surfing, perhaps?—be sure to tell your newest adventurer. Make sure he or she understands that you may not know what to expect either, and that’s ok! Expanding your horizons is one of the best parts of adventure travel.

When planning activities, be very clear about physical activity and logistics. You may not have all of the details, but having an idea of how long you’ll hike or how long you’ll be kayaking not only helps you stay organized but also gives your loved one an idea at what to expect.

In addition, keep your travel buddy in the loop about gear and other important logistics like vaccinations and doctor prescriptions. These kind of things may be second nature to seasoned adventure junkies, but a relatively new traveler may not even think about them. In Colombia, my brother and I opted to sleep in hammocks in the jungle—something neither of us had done before. I suggested he pick up a quick-dry towel that could double as a blanket for the cool jungle nights.

Also, be sure to give your travel partner a heads up about any vaccinations or prescription medications required for where you’re headed. Let them know a rough timeline for gear, bookings, and doctors’ appointments.

Stay Flexible and Focus on the Fun

1rKE5os8hLKvNltvZ2vbpz
Maybe sandals were a poor choice.

Eli Duke

Adventure travel is not about curating the perfect experience—it is about being flexible and trying something new. If you are a well-seasoned adventure veteran, try choosing an activity both of you have never done before. Perhaps it’s a new trail or climbing route, or an entirely new-to-you activity that you’ve always wanted to try.

Doing something new with someone you love strengthens bonds, even if the trip turns out to be a complete disaster. In the Colombian jungle, my brother and I ended up trekking barefoot for several miles through knee-deep mud. We also both ended up getting sick upon returning home, but we still laugh about how wild it was to be sucked up by the muddy jungle landscape.

Consider an adventurous activity you would both be interested in trying. It doesn’t have to be complicated or epic. For example, when I headed to New Zealand with my then-untraveled boyfriend, we decided to explore the country by road and lived in a van. #Vanlife was an entirely new experience for us both. Why? Although it infiltrated every aspect of our trip, it was a simple twist that made the destination seem more adventurous.

Introducing a loved one to adventure travel connects you in a shared experience that you’ll look back on for a lifetime. And you may find yourself with a bonus: a fellow travel junkie who invites you on their next adventure.

Written by Meg Atteberry for RootsRated and legally licensed through the Matcha publisher network. Please direct all licensing questions to [email protected].

Featured image provided by Meg Atteberry

800 Miles in 7 Days: A Quintessential Colorado Road Trip

To many, Denver is the true gateway to the West. Sure, St. Louis may have an arch, but it also has 850-miles of Midwestern plains to contend with before the real West begins. And like so many early frontiersmen, who reached the western edge of the High Plains—where modern-day Denver is located—and gazed upon the Front Range in both terror and excitement, the Mile High City still, to this day, acts as the ultimate springboard for Colorado adventure.

Here, we bring you a comprehensive guide to one of the best Colorado adventures you can have: a week-long road trip through the state. Combine the glory of the open road with the solace of the mountains on this 7-day journey from Denver over some of the nation’s most scenic highways.

Day One

Denver to Buena Vista via US-285 S
122 Miles, approx. 2.5 hours

40yZCpOvy0O6mcqKw2yQyg


Pierce Martin

Do as the locals do and head south out of Denver to avoid the I-70 traffic. Take scenic route 285 towards the mountains, to the riverside town of Buena Vista, right in the heart of the Collegiate Peaks.

If you’re itching to stretch your legs early on, the Colorado Trail intersects with Kenosha Pass about 45 miles outside of the city, and it's a section that is a particular favorite for hikers and mountain bikers alike, so pick your poison!

For a more leisurely stroll with a bit of interesting history, stop in South Park City to reimagine the life of those old frontiersman in the re-created mining town, made from buildings salvaged from the 1800's. Tours lead you through to see old furnishings and equipment from the gold-mining boom.

If cool rivers are what’s calling to you, American Adventures in Buena Vista can take you through one of the state’s premier stretches of whitewater, Browns Canyon. With breathtaking scenery and a solid mix of calm water and exhilarating rapids, it’s easy to understand why this is a favorite run for whitewater enthusiasts. For more thrills, the Numbers Route will test anyone's mettle, but whichever you choose, owners Mike and Amber will take great care of you.

To replenish yourselves, treat your crew to Eddyline Brewery in Downtown Buena Vista. Delicious craft beers combine wonderfully with their elegant menu; and high quality burgers and beer are a good follow up to any adventure, after all. The brewpub is close to the river, which has a nice walking trail running alongside it. South of town is Angel of Shavano Campground, a first-come first-serve site with 20 spots among aspen and spruce trees. Nestled in the San Isabel National Forest, this is a gorgeous place to rest your head and wake up to in the morning.

Day Two

Buena Vista/Salida to Crested Butte via US-50 W and CO-135 N
92 miles, approx. 1 hour and 45 minutes

391OiabTrOUsKEQ6uyQMYU


thomas paris

On day two, you’re headed to Crested Butte with a stop at one of the nation’s top mountain biking trails, Monarch Crest. Take route 50 west, about 19 miles outside Poncha Springs to Monarch Pass, where you’ll find the trailhead. There are shuttle services that go between the trailhead and Poncha Springs, or if you’re lucky enough to be in a road trip convoy, just leave one car at the intersection of highways 50 and 285. The trail is 35.5 miles, averages about four and a half hours and will be a ride you’ll likely never forget.

Continue on 50 to CO-193, which will take you right into Crested Butte. Enjoy scenic views of the Sawatch Range along the way, or save your appetite for mountains until you get to town, where you can access world class climbing at Skyland Boulders. Since you will be exhausted, it’s a great thing that downtown Crested Butte is a slow-paced place to take a walk and find a bite to eat, and you can’t go wrong at Brick Oven Pizzeria and Pub.

As the sun begins to drop, make your way over to Lake Irwin Campground, nestled between Lake Irwin itself and the unreal Ruby Mountain Range. When you wake up, it would be a shame not to fuel up at the Sunflower Deli back in town!

Day Three

Crested Butte to Fruita via US-50 W
163 Miles, approx. 3 hours

RdxHwiaXqUakEKaUqMKQs


Sheila Sund

Day three is one of the longer treks in the trip, but what's a good road trip without a long-haul or two? You’re taking 50 west from Crested Butte to Fruita. About 90 miles into the drive you’ll reach its main attraction, Black Canyon in Gunnison National Park. Try to hit the road early, as the views in the canyon can consume two to three hours of the day. Once in the canyon, you have several options for exploring it.

First is South Rim Road, a seven mile stretch featuring 12 scenic overlooks. Some take a short hike to get to the rim, which will be a great way to stretch your legs. The best views are Gunnison Point, Chasm View, Painted Wall, and Sunset View. There is a visitor’s center at Gunnison Point which opens every day in the summer and most days the rest of the year. If you're feeling super ambitious, you can hike down into the canyon, but be aware that the hike back up is very demanding.

North Rim Road is closed in winter, but if you’re there in the summer, the vertical walls found on this gravel road provide some of the most awe-inspiring views in the park with six distinct overlooks.

If you need a bit more activity this day, the Kokopelli Mountain Bike Trail features red-rocks and river views that will take your breath away. Before bunking down for the night, fill your belly at the Hot Tomato Cafe, a local favorite!

Day Four

Fruita to Yampa via I-70 E and CO-131 N
182 Miles, approx. 3 hours

58rLaVz2Wsa2iGYYkw2s60


DQmountaingirl

Today is your day to experience, first-hand, the biodiversity of the gorgeous state of Colorado. Twenty-five miles into day four, you reach the town of Palisade. How can a state that makes your nose so dry create fruit so big and juicy? The microclimate in Palisade is how.

This section of the state, known as the Grand Valley, sits atop artesian wells and combines dry air, sunny days, and cool nights to provide an ideal home for two-thirds of the state’s award-winning wineries and the famous Palisade Peaches. Flying in the face of the well-known craft beer culture and cattle farms, this vineyard-rich part of the state lets you know just how unique Colorado is. Colterris Wines and the Clark Family Fruit Stand are two of our favorites.

About half-way to Yampa, enjoy the drive through 12.5 mile Glenwood Canyon. This historic railroad route boasts walls 1,300 ft high, the highest along that stretch of the Upper Colorado River. Shortly after, you’ll head north on CO-131 for the final push into Yampa.

When heading into town, you’re about 15 miles from your campsite and one of the more dynamic trails in the state. But fair warning: only attempt the entire Devil’s Causeway if the wine has worn off! If it hasn’t, or if the conditions aren’t perfect, you can still hike the area and enjoy breathtaking views, but should probably avoid the highly dangerous Devil’s Causeway.

To get there, take County Road 7 S for 6 miles, and continue on another 9 miles as it turns to Forest Service Road 900, which will take you to the north side of Stillwater Reservoir. Regardless of conditions, you can hike 2 to 3 miles into the Flat Tops Wilderness area to experience large table-top mountains that contrast the rocky pyramids in the rest of the state. A moderate elevation gain will bring you through wild-flower meadows and past a lake before you have to decide on conquering the causeway or not. A comprehensive trail guide is provided in the link above!

A few miles from the same trailhead is Bear Lake Campground, the $10 fee is well worth it!

Day Five

Yampa to Steamboat Springs via CO-131 N
30 Miles, approx. 40 minutes

2E9zKtluiEaqSWAiOWW4Ci


Andrew Magill

After your intense day four, take a nice easy 40 minute drive into one of Colorado’s premier mountain towns, Steamboat Springs.

The nearby Yampa River provides the opportunity to float one of Colorado's gorgeous mountain rivers, while experiencing Steamboat in a unique way. This family-friendly float can be anywhere from one to three hours, depending on river conditions, where you put-in, and if you choose to stop at a park or restaurant along the way! Whatever type of float you’re in the mood for, the folks at Bucking Rainbow can get you set up.

Take a break to fuel up with a homemade pretzel, served with porter cream sauce, at Mahogany Ridge Brewery and Grill.

To warm up, finish off your rocky mountain water day with a dip in Strawberry Hot Springs. These naturally fed hot springs are favorites of the locals for their natural feel and beauty. Numerous small to mid-size pools are shaped right into the rock and have an ice-cold stream flowing through, in case you want to counter your hot soak with a cold plunge. You’re sure to find a spot perfect for you at Strawberry Hot Springs.

If there’s no room for you to stay at the hot springs, get a head start on day six by heading down US-40 E to Meadows Campground in the heart of Routt National Forest. A serene night's sleep is a given, as it's nestled in the evergreens of Rabbit Ears Pass.

Day Six

Steamboat to Estes Park via US-40 E and US-34
139 Miles, approx. 3 hours

6yu4n3cQPSAOmwsiO262W4


Dave Dugdale

Just when you thought Colorado could not be more strikingly beautiful, you drive the stretch of 34 called Trail Ridge Road. This road is named for its proximity to the trails that Native Americans used to cross the Rockies, and it is the highest continuously paved road in the US, reaching an altitude of 12,183 feet. If the expansive rocky mountain views don’t get you, a siting of Elk or Big Horned Sheep surely will, as the animals are regularly seen from the road.

You will be ready to get out of the car by the time you reach town, and luckily you’ll be close to a quintessential Colorado hike for aspen trees, panoramic views, and an alpine lake. Once in town, take MacGregor Avenue north 1.2 miles to the trailhead of Gem Lake, which will be on your left after briefly becoming Devils Gulch Road.

The post-hike experience in this town is not complete without a margarita from Ed’s Cantina, and for your last night on the road, we recommend a real bed in town because it would be hard to beat Estes Park, if anyone ever tried! Don’t feed the elk, even though you will probably get quite close to one.

Day Seven

Estes Park back to Denver via US-36 E
66 miles, approx. 1.5 hours

GsdWpKlYgoMmMqsYYaQmw


Ken Lund

Get motivated for the bittersweet ending to your road trip with some locally roasted, fair trade coffee at Kind Coffee in downtown Estes; the floors are even made from bamboo, a renewable resource!

Boulder is your halfway point between Estes and Denver, and is a great place to polish off your trip. The Flatirons in Chautauqua Park are some of the more unique rock formations in Colorado, because they literally look like they are laying on their side. Flatiron One is the perfect hike to experience the best of what Boulder hiking has to offer; it is steep which provides a bit of a workout, while also paying out priceless views of the Boulder Valley, Indian Peaks Wilderness, and Rocky Mountain National Park. Start the 2.9 mile loop at the Chatauqua Park Trailhead parking on Baseline Road if the lot is full, which it is prone to be early on weekends!

To re-fuel, it is hard to beat a burger at The Sink, a long-time Boulder favorite dating back to the time when Robert Redford was the janitor scrubbing the floors! Have a grass-fed Sink Burger with signature Sink Hickory Sauce to taste local history. The Sink is located on The Hill, a favorite neighborhood of CU-Boulder students.

Homeward bound after Boulder, soak in the memories of a great road trip and bask in your new-found knowledge of this great state and all its beauty!

Written by Sean Guidera for RootsRated and legally licensed through the Matcha publisher network. Please direct all licensing questions to [email protected].

Featured image provided by Zach Dischner

Maroon Bells and Crater Lake Hiking

Intro

No trip to Aspen would be complete without visiting the Maroon Bells. Don’t let the crowds deter or the fact that you have to take a bus from Aspen Highlands Village mid-June through Labor Day (and on the weekends throughout September) you, the views and photo opportunities are beyond worth the effort. The easiest hike is more of a stroll than a hike, it’s flat and short and makes the area a great place to bring small children and the elderly. It’s also a great place to snap some incredible family photos. Maroon Lake is just a couple hundred yards from the parking areas and the bus drop off. You can stroll along the west side of the lake or go around it to the south. 

If you feel a little more energetic resolve to hike to Crater Lake, a high-alpine lake that sits at the base of the Maroon Bells. The rocky trail’s grade is moderate and the hike to Crater Lake requires about 500 vertical feet in gain over about 1.5 miles. To access Crater Lake hike to the west end of Maroon Lake. Here, you’ll find a trail that splits off to your left, take that. You’ll notice at the trailhead there’s a sign cautioning people about the “Deadly Bells” and the dangers of climbing the two peaks. 

Crater Lake provides not just a great view of the Maroon Bells, but Aspen’s famed 14,000-foot peak, Pyramid Peak, sits to the left. West Maroon Pass, the popular hiking route to Crested Butte, is accessed via the south and east sides of the Bells. Four Pass Loop sits west of the Bells, which is another renowned three- to four-day overnight route over Buckskin Pass. Plan ahead use the corresponding RootsRated.com trail reviews to learn more about these hikes.

What Makes It Great

The iconic view of the Maroon Bells behind Maroon Lake is beyond gorgeous and will likely be one of the more unforgettable places you’ve ever visited. The view is especially breathtaking in September, when the hillsides that bookend the lake are ablaze with the yellow glow from changing aspen leaves.

Seeing this iconic landmark in person is reason enough to brag to your friends, but if you’re lucky to visit the Maroon Bells after a late September dusting the combination of the snow-capped Bells and bright yellow aspen leaves is beyond stunning.

Who is Going to Love It

The Maroon Bells are among North America’s most photographed mountains, so those with a penchant for photography will go absolutely bonkers when they finally see the Bells majesty in person. Families with youngsters and grandparents in tows will love strolling around beautiful Maroon Lake, while those looking for a short, moderate hike will appreciate the trail to Crater Lake.

Directions, Parking, & Regulations

Maroon Creek Road is closed to public automobile traffic from 8 a.m. to 5 p.m. from mid-June through through September. Unless you’re towing a horse trailer, have small children in car seats or are transporting a disabled person, you’ll need to take the bus ($6) from Aspen Highlands Village. If you’re staying in downtown Aspen you can hop on the bust to Aspen Highlands from Rubey Park. The cost to drive a private vehicle up outside these hours or with the above exceptions is $10 per vehicle. If you’re driving your own vehicle to Aspen Highlands, take Highway 82 west out of Aspen. At the roundabout, take the second right (there will be signs to Aspen Highlands and Maroon Creek Road) and follow this to the Highlands parking lot on your left a couple miles up the road. If it is after the bus hours, follow this road all the way to the Bells parking lot, which is about 9.5 miles past the roundabout.

Written by Leah Fielding for RootsRated and legally licensed through the Matcha publisher network. Please direct all licensing questions to [email protected].

Featured image provided by Leah Fielding

Archives